Greetings. By now you should have completed the roller assemblies, and should be ready to fabricate the gears. If you are tempted to go out and buy (shudder!) a set of gears, be warned that you are not likely to find any that will be compatible, and, if you do, they will be very, very expensive. Making a good set of gears is not really all that difficult, just time consuming. But then, I did warn you that time would be your major investment in this project. One other thing: while these gears would likely be considered “crude” by industrial standards, you should nonetheless be prepared to be as precise as possible when measuring, marking, and cutting during this phase of the project. Gears can be quite intolerant if your work is out of tolerance.
The materials list for this segment is fairly simple - you'll need
1 - 5" X 10" X 1" thick piece of polyethylene plastic
1 - 3” X 6” X 1/2” thick piece of polyethylene plastic
1 - 5/16" X 2" square "U" bolt
4 - 5/16” hex nuts
2 - lock washers to fit the “U” bolt
2 - 1/2" NPT Black Iron Pipe Caps
1 - three inch length of 3/8” ID Black Iron Pipe
1 - 1/4”-20 X 1-1/4” Steel Hex Head Cap Screw with matching nut and lock washer
1 - four foot long piece of 3/4” thick pine, about 5 inches wide, to be used to make a jig for cutting the gear teeth.
We'll start out by cutting the gear blanks from the 1” thick polyethylene. All plastic cutting will be done using the radial saw with a fine toothed plywood blade. First we will cut the 5” X 10” stock into two 5” X 5” pieces. Measure and mark the work piece at 5” and position it on the saw table with the saw blade centered on the mark. Clamp a piece of scrap wood onto the saw table, butted up against the work piece to act as a stop so the work piece cannot move. Set the blade height to make a 1/8” deep cut. Use another piece of scrap wood to hold the work piece down (holding small work pieces directly with your hand is not recommended) and make the first cut. Reset the blade height 1/8” lower and make the next cut, repeating as needed until the work piece has been completely cut through. At this point you can also cut a 5” piece off the end of the 3/4” pine board, to be used as a “practice” gear blank. While you are at it, you may as well reposition the stop board and cut the 1/2” thick polyethylene stock into two 3” square pieces, which will eventually become spacers to properly position the gears on the axles of the rollers. This should also be done in several 1/8” deep cuts. You should now have two approximately 5” square pieces of 1” thick plastic, one 5” square piece of 3/4” thick pine, two 3” square pieces of 1/2” thick plastic, and all ten fingers still attached. Any divergence from these numbers is a strong indication that you may have errored.
Find the center point on each square by drawing lines between opposing corners. Use an ice pick or a small nail to set a drill point at the center of each square, then drill a 5/64” diameter hole at each center point. This hole must be drilled exactly perpendicular to the surface of the work piece. Set a drawing compass to 2” and draw a 4” diameter circle on both faces of each 5” square work piece, using the 5/64” hole as the center point. Reset the compass to 1-9/16” and draw a 3-1/8” diameter circle on both faces of each 5” square work piece, again using the 5/64” hole as the center point. Reset the compass to 1” and draw a 2” diameter circle on one face of each of the 3” square work pieces using, you guessed it, the 5/64” hole as the center point. Remove the stop board from the saw table, and replace it with the Circle Cutting Jig you used in Part 2 of this project. Install one of the 5” plastic squares onto the jig, sliding the hole at its center point down onto the pivot nail on the jig. Position the jig board on the saw table so that it is snug against the guide rail and the saw cut is exactly tangent to the 4” circle on the work piece, then clamp the jig board onto the saw table using “C” clamps. Set the blade height to make a 1/8” deep cut. To cut out the circle, make a series of cuts, rotating the work piece on the nail a degree or two after each cut. Make each cut slowly to keep the saw blade from grabbing the work piece. Again, it is highly recommended that you do not hold the work piece with your hand - use a piece of scrap wood as a holder. After one complete revolution of the work piece, remove it and make the same series of cuts on the second work piece. When both pieces have been cut to 1/8”, lower the blade 1/8” and make the next series of cuts, repeating as needed after each complete revolution of both work pieces until all material outside of the 4” circle has been removed. You should now have two 4” diameter plastic gear blanks. Now cut out the pine blank - you can do this in a single rotation of the work piece with the saw blade fully lowered, because the pine is much softer and easier to cut than the plastic. Finally, mount one of the 3” square plastic pieces on the circle jig and reposition the jig so the saw cut will be exactly tangent to the 2” circle on the work piece, then cut out the spacers, again cutting 1/8” deep per revolution.
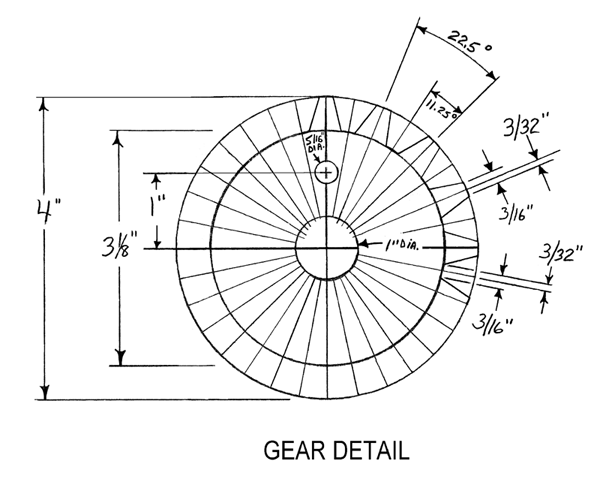
Our gears will have sixteen teeth each. The spacing of the teeth is critical, so it must be laid-out carefully. I recommend doing the rest of the gear fabrication steps on the pine blank first for practice so you don't waste any of the plastic. First, on each blank, erase one of the lines that were originally used to find the center point, as they may not be exactly perpendicular. Then, using the remaining line as a baseline, use a square to draw a line exactly perpendicular to the baseline through the center point and across the entire face of the blank. Draw bisecting lines through each of the resulting 90 degree angles and the center point to form eight 45 degree angles (that geometry you flunked in high school finally comes in handy). Repeat this procedure again to form sixteen 22.5 degree angles, and once again to form thirty two 11.25 degree angles. The 32 radius lines represent the centers of each gear tooth and the gaps between the teeth respectively (See accompanying diagram). Once the lines have been drawn, the top and bottom of each tooth is defined as follows.
Starting with any one radius line, which we will call line #1, measure 3/32” out from each side of the line at the outer rim of the gear blank and mark the blank at those points. Skip the next radius line (#2) to the right (clockwise) and repeat this procedure for the third radius line (#3). Repeat, skipping the even numbered lines, until all of the odd numbered lines have been done. You will then perform the same task for all of the even numbered lines, except the measurements are to be done on the 3-1/8” diameter circle. With that done, you can then “connect the dots”, drawing a straight line from each of the marks on the outside diameter of the blank to the closest corresponding mark on the 3-1/8” diameter circle. You should end up with a layout of sixteen identical teeth, each 3/16” wide at the “point”, and sixteen identical gaps, each 3/16” wide at the bottom. Finally, use a square to draw a line across the edge of each blank at each of the radius lines. These “index” lines must be perpendicular to the face of the blank.
It is time now to make the jig for cutting the gear teeth. This jig will function in a fashion similar to that of the circle cutting jig, except that the orientation of the jig and work piece will be vertical instead of horizontal. Get the 3/4” X 5” pine board and measure its length, then mark the board at the midpoint and use a square to draw a centerline across the width of the board at the midpoint. Draw an arrowhead at one end of the centerline to designate that end as the TOP of the jig. Measure 2” down from the top along the centerline and mark across the centerline at that point. Set a drill point at the mark and drill a 5/64” diameter hole through the work piece. This hole must be exactly perpendicular to the face of the jig. Use a compass to draw a 3-1/8” diameter circle on the face of the jig, using the 5/64” hole as the center point. At the top end of the centerline, use a square to draw a line across the top edge of the jig. This line must be perpendicular to the face of the jig. Next, insert a 5/64” diameter X 1-1/2” long nail into the 5/64” hole from the back of the jig. Make sure the head of the nail is snug against the back of the jig and put a piece of tape over it to hold it in place. Raise the saw blade high enough to completely clear the top of the jig, then stand the jig up against the saw table guide rail and position it so that the saw blade is centered on the centerline of the jig, then clamp the jig to the guide rail at both ends using “C” clamps. Lower the saw blade until it just makes contact with the top edge of the jig and verify that the blade is exactly centered on the centerline of the jig. Adjust the position of the jig and re-clamp as needed. Return the saw to its fully retracted position, then lower the blade about 1/4” and make a cut through the centerline on the jig. Lower the saw blade one revolution of the height adjusting screw and cut again. Repeat this height adjustment and cutting procedure until the saw cut just makes contact with, but does not cut through the 3-1/8” diameter circle on the face of the jig.
Install the pine gear blank onto the jig, sliding the hole at its center point onto the pivot nail on the jig. Align one of the index lines corresponding to the center of a gap between gear teeth with the centerline on the jig. Clamp the gear blank onto the jig with a small “C” clamp while maintaining the alignment with the jig centerline. Make a cut through the blank, then make note of the position of
the left edge of the cut in relation to the base of the gear tooth immediately to the left (counterclockwise from) the index line. Our immediate objective is to position the left edge of the cut exactly at the base of the gear tooth to the left, which is the point where
the line defining the right side of that tooth intersects with the 3-1/8” diameter circle. Loosen the clamp on the gear blank and rotate the blank clockwise, just a tiny bit, then re-clamp the blank and make another cut. Repeat this process until the left edge of the cut is in the desired position, then make a mark on the top edge of the jig at the point corresponding to the position of index line in the center of the tooth immediately to the left (counterclockwise from) of the cut. Dismount the gear blank and use a square to draw an index line across the top edge of the jig. This index line, which we will designate as Index “A”, must be exactly perpendicular to the face of the jig.
Although the jig is not yet complete, in order to take full advantage of the current positioning so painstakingly achieved, and to make sure we get consistently accurate cuts, we will continue making cuts in the pine blank to establish one side of the base of each gear tooth. If the cuts are consistently accurate, we can make another cut to establish the second side of the base of each gear tooth. Proceed as follows - Unclamp the blank and rotate it clockwise until the centerline of the next tooth is exactly aligned with Index “A” on the jig, then re-clamp the blank while maintaining the alignment. Make the cut and verify that the left edge of the cut is exactly at the base of the gear tooth to the left, and the bottom of the cut just touches but does not cut into the 3-1/8” diameter circle on the face of the blank. Repeat until one side of the base of each tooth has been established. Now reposition the blank on the jig so that the face of the blank is toward the jig, and repeat the indexing and cutting procedure, checking the accuracy of each cut, until the second side of the base of each tooth has been established. If there is any significant variation in the accuracy of any cut, you likely have not been precise enough in measuring and marking the radius lines on the face of the blank or in aligning them with the Index. You can get away with about +/-1/32” inaccuracy maximum, any more than that and you should make another pine blank and start over, including establishing Index “A” again from scratch. If you have to do that, put a reference mark on the gear jig and on the saw table so you will be able to get the gear jig back in the same position after using the circle jig to make the blank.
Once you have successfully established both sides of the base of each tooth on a pine blank, you should double check the precision of your layouts on the plastic gear blanks and make any necessary corrections before making the same cuts on the plastic blanks. When cutting the plastic blanks, make each cut slowly to avoid binding the blade. When this step has been completed, set the plastic blanks aside and finish making the gear jig using the pine blank. Install the pine blank on the jig with the laid-out face of the blank pointing out away from the jig. Position the blank so the line defining the right side of any one tooth is exactly vertical, using a square to verify vertical alignment, and clamp the blank to the jig while maintaining the alignment. Position the jig so that the left edge of the saw blade is aligned with the vertical line on the blank defining the right side of the gear tooth, and clamp the jig to the saw table guide rail. Return the saw to its fully retracted position, then lower the blade about 1/4” and make a cut through the jig and blank. Lower the saw blade one revolution of the height adjusting screw and cut again. Repeat this height adjustment and cutting procedure until the saw cut just makes contact with, but does not cut through the 3-1/8” diameter circle on the face of the blank. Make a mark on the top edge of the jig at the point corresponding to the position of index line in the center of the tooth on which the cut has just been made. Dismount the gear blank and use a square to draw an index line across the top edge of the jig. This index line, which we will designate as Index “B”, must be exactly perpendicular to the face of the jig.
Now rotate the blank clockwise until the centerline of the next tooth is exactly aligned with Index “B” on the jig, then re-clamp the blank while maintaining the alignment. Proceed as before, indexing and cutting until one side of each tooth has been established, then flip the blank over so the laid-out face is toward the jig and continue until both sides of all teeth have been cut. Inspect the pine gear, checking for any irregularities. Again, if you are not satisfied with the accuracy of your work on the pine gear, you should try again with another pine blank before proceeding with the plastic gears. Practice makes perfect! When you are confident in the quality of your work, go ahead and finish cutting the teeth on the plastic gears. As a finishing touch, use some medium grit sandpaper to smooth out any minor irregularities on the interior sides of the gear teeth and to slightly round off the top interior edges of each tooth.
We're not done yet. Now we have to drill out the center of each gear to fit the axles on the rollers. We also have to drill another hole to accommodate a clamping bolt that will secure the gear to the axle. If you have one, use a drill press to ensure that the holes will be drilled exactly perpendicular to the face of the gear. First, on each gear, measure and mark a point one inch out from the center along any radius line on the face of the gear. Set drill points, then drill a 5/16” diameter hole through each gear, perpendicular to the face of the gear. Next, measure the outside diameter of one of the 6” long axles and select a spade drill bit of the same or just slightly smaller size (around 13/16” to 7/8”). Drill just over halfway through one side of each gear, using the 5/64” diameter center hole as the drill point. Then flip the gears over and drill through from the second side. At this point you should also use the same bit to drill the 1/2” thick spacers, again halfway through from each side. Test fit the gears and spacers onto the 6” axles on the rollers - the fit should be fairly tight, and you may have to thread the gears and spacers past the threads on the ends of the axles before you can slide them onto the smooth portion of the axle. If the holes in the centers of the gears and spacers are too small, use a roll of medium grit sandpaper to carefully remove a small amount of material at a time, uniformly around the circumference of each hole, until the gears and spacers can be installed on the axles. Be careful not to remove too much material, and also be careful to remove material uniformly so as not to make the holes out-of-round - a loose fit or any eccentricity could cause serious problems during operation
of the mill.
The next step is making and mounting the clamping bolts. Get the 5/16" X 2" square "U" bolt and clamp it in a vise with the common leg up. Measure and mark the center point on the common leg, then use a hacksaw to cut the “U” bolt at the center point, resulting in two 1” X 2” “L” bolts. Use a file to dress-off burrs and put a slight bevel on the cut ends of the 1” legs on each “L” bolt. Slide the gears onto the 6” axles of the rollers, then snugly install a 1/2” pipe cap on the end of each 6” axle. Measure and mark points on each axle 5/32” in from the inboard end of the pipe cap, set drill points and drill a 5/16” hole straight through each axle and out the opposite side. Dress-off burrs on both sides of the axles, then slide the 2” threaded leg of an “L” bolt all the way through each axle with the 1” leg of the “L” bolt pointing toward the gear. Align the 1” leg of the “L” bolt with the 5/16” hole on the outboard face of the gear, then push the gear toward the pipe cap until the 1” leg of the “L” bolt is fully inserted into the 5/16” hole in the gear. Install a 5/16” hex nut on each “L” bolt and thread it tightly up against the outside diameter of the pipe cap. Then install a lock washer and a second hex nut on each “L” bolt, threading the nut tightly until the lock washer is fully compressed.
Axle Adaptor & Drive Pulley
We're on the last lap - making an axle adaptor and installing the drive pulley. This part is relatively simple. Get the 3” piece of 3/8” pipe and test-fit one end into the hub of the drive pulley. If the pipe will not fit into the hub, use a bench grinder to very carefully remove a thin, uniform layer of material from the end of the pipe, then try the test-fit again. Repeat this procedure until the pipe fits into the hub with the end of the pipe flush with the outboard surface of the hub. Remove the setscrew from the hub and use a point punch to set a drill point on the 3/8” pipe trough the center of the setscrew hole in the hub. Remove the pipe from the hub and use a 1/4” drill bit to drill a slight “dimple” about 1/16” to 3/32” deep into the surface of the pipe at the drill point - do not drill through the pipe. Reinstall the pipe in the hub with the “dimple” aligned with the setscrew hole, install and tighten the setscrew. Try to pull the pipe out of the hub - it should not move, if it does you may need to make the “dimple” a little deeper. Once the hub end of the pipe is properly fitted, remove it from the hub and test-fit the opposite end into the end of the 4” axle on the drive roller. As needed, use the bench grinder as before to make the pipe fit into the axle. Once the pipe fits into the axle, remove it from the axle and measure and mark a drill point on the axle 3/4” from the end. Drill a 1/4” hole straight through and out the opposite side of the axle, then dress-off burrs on both sides of the axle. Reinstall the adapter pipe into the drive pulley, then slide the open end of the adapter all the way into the axle. Use a point punch to set a drill point on the adapter through the center of one of the 1/4” holes in the axle. Pull the adapter 3/4” out of the axle, then set another drill point. Repeat once more, resulting in a total of three drill points. Remove the adapter from the axle and hub and drill a 1/4” hole straight through and out the opposite side of the adapter at each drill point. Reinstall the adapter to the hub and axle, then align one of the holes in the adapter with the hole in the axle and install the 1/4”-20 X 1-1/4” Steel Hex Head Cap Screw with matching nut and lock washer.
This completes the gear and drive pulley segment of the project. Keep in mind that the gears and drive pulley will have to be uninstalled in order to build the housing for our mill, which we will take on next time around. Things will be getting considerably easier now, the rest of the project is mostly simple woodwork and hardware installation. So, in preparation for our next session, you should marshal the following materials:
Construction lumber - (4) Three foot lengths of 2" X 12" , (2) 18" lengths of 2" X 4", (2) 15" lengths of 2" X 6", (2) 15" lengths of 2" X 8". (1) 1/4 sheet (2' X 4') 1/4" lauan plywood underlayment (actual minimum size).
(4) Swivel type 1-1/2" or 2" Flush Mount Casters
(1) Box of 100 #10 X 2-1/2" Steel Flat Head Slotted Wood Screws
(60) #8 X 3/4" Steel Flat Head Phillips Wood Screws
(25) #10 X 1-1/4" Steel Pan Head Slotted Wood Screws
(6) 1/4"-20 Steel Tee Nuts
(6) 1/4"-20 X 3" Steel Hex Head Cap Screw with matching Washers
(2) 1/4"-20 Steel Hex Nuts
(2) U-shaped metal Drawer Pull Handles with Mounting Screws
(1) Small container of Wood Glue
(1) 8" X 24" piece of thin gauge Sheet Metal (furnace duct material)
Good hunting.
Inexpensively (but not cheaply!) yours,
The Thrifty Gadgeteer |